


Installation and configuration of smartmontools for checking disks on a physical server.
The smartmontools package consists of two utilities, smartctl and smartd, which monitor system drives using self-testing, analysis, and the S.M.A.R.T. system. This package is available on most modern Linux systems.
smartctl - allows viewing SMART disk parameters and running tests manually via the console. It is used for one-time testing of hard drives.
smartd - monitors the polled device (configurable by time), provides error logs, and tracks attribute changes. It is used for autonomous monitoring.
Installation
Installing a set of utilities for monitoring hard drives.
Debian/Ubuntu:
apt-get update
apt-get install smartmontools
CentOS:
yum update
yum install smartmontools
Information about drive
Now you can view information about the drives. Simply enter the command:
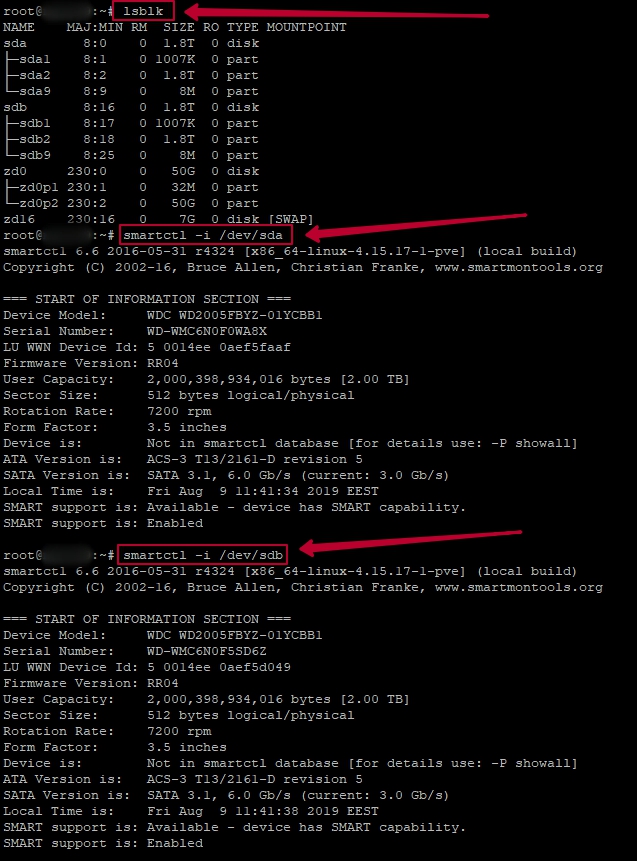
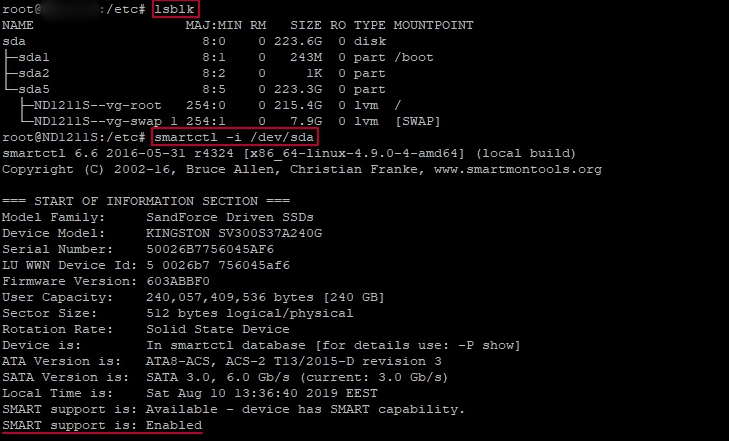
smartctl -i /dev/sdx
where "x" is the letter of the disk, it may not be sda, for example, it could be vda.
For example with HDD:
For example with SSD:
You can view the disks in the system using the following commands:
lsblkl

s -la /dev/ | grep sd

If S.M.A.R.T. support is: Disabled, then to enable it, you need to execute the command:
P.S.: However, it is necessary to ensure that the disk supports S.M.A.R.T. Technology
smartctl -s on /dev/sda

Now we can display all the data using the smartctl command with the -a option and specify the disk that needs to be analyzed.
smartctl -a /dev/sda
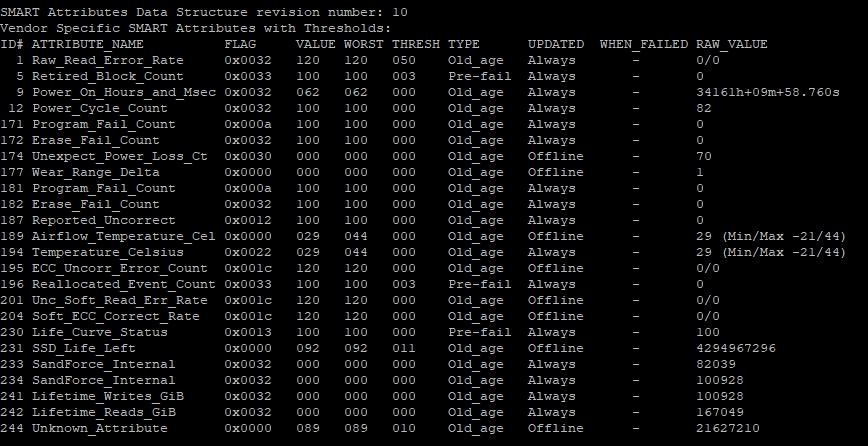
First, the information about the model of your HDD and SSD will be provided. Then the model information will be displayed.
Disk Testing
There are two types of testing - short and long.
The short test is initiated by the command:
smartctl -t short /dev/sda
The long test is initiated by the command:
smartctl -t long /dev/sda
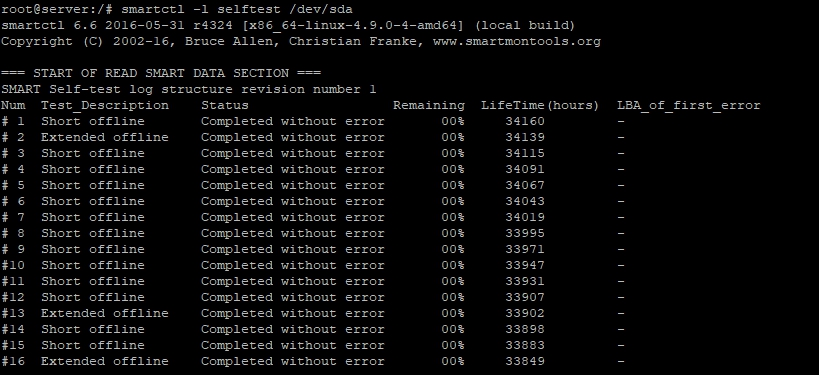
The results of the tests can be viewed using the command:
smartctl -l selftest /dev/sda
P.S. If you need to cancel test, use the command: smartctl -X
Setting up automatic disk health checks and notifications upon error occurrence
Configuring the S.M.A.R.T. daemon:
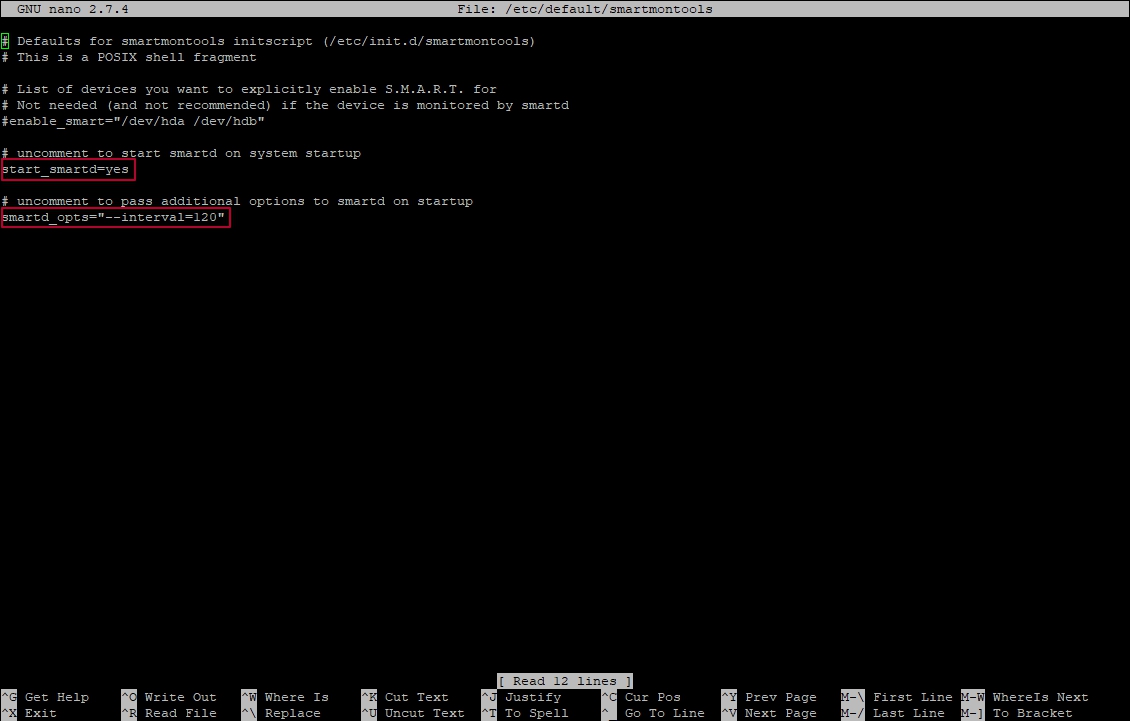
nano /etc/default/smartmontools
In the file you need to uncomment two lines:
start_smartd=yes

smartd_opts="—interval=120"
Please note that in this example, the value "120" means 120 seconds. This means that every 2 minutes an email will be sent with disk status monitoring. If, for example, you need to set up email sending every 2 hours, then the line will look as follows.
smartd_opts="—interval=7200"
Now you need to edit the configuration file and set the necessary parameters for sending test results to email.
nano /etc/smartd.conf
/dev/sda -a -o on -S on -s (L/../../4/16) -m root -M exec /usr/share/smartmontools/smartd-runner
If you need to add another disk for monitoring, then write the same thing starting from the next line, only specify a disk other than sda, for example, sdb.
/dev/sdb -a -o on -S on -s (L/../../4/16) -m root -M exec /usr/share/smartmontools/smartd-runner
Each value in the line answer to a separate parameter:
-a - Disk health analysis
-o on - Enable S.M.A.R.T. tests to update attribute status
-S on - Enable automatic attribute saving
-s - Self-test, in this case (L - "long" run long test on Thursdays at 16:00). If you need to select multiple days for monitoring, specify the desired range, for example, from Monday to Sunday will be 1-7. The format specified in parentheses is as follows (Test type/month-year "01-12"/day "01-31"/day of the week "1-7"/time in hours "00-23")
-m - Mail point of contact for issues. In this example, mail will be sent to the root user (you can set redirection to the required mailbox in /etc/aliases). Instead of the root parameter, you can also specify the required e-mail address (-m name@domain.com)
-M - Parameter responsible for modifying the message before sending. In this example, the script /usr/share/smartmontools/smartd-runner is launched. This option is useful if you need to select a different mail client, for example.
After setting all the necessary parameters, restart the smartmontools with the following command:
service smartmontools restart
 Telegram Chat